

The cloud adoption trend isn’t slowing down. That’s no wonder: cloud computing has completely changed the way we think about IT infrastructure. However, for organizations that deal with never-ending deployments, the complexity of provisioning and managing all the infrastructure elements can become a headache and a source of serious issues. In this case, infrastructure codification, known as Infrastructure as Code, comes to the rescue.
Why Infrastructure as Code?
The traditional way to create and manage cloud infrastructure is to do it manually from the cloud provider’s web-based user interface (e.g. Azure portal or AWS Management Console). However, this solution has several defects: it’s highly error-prone and non-replicable. Manual infrastructure management and provisioning can lead to a situation when a given infrastructure setup is a mystery, meaning that it’s nearly impossible to recreate it.
Imagine that you could treat your infrastructure the same way you handle code: writing commands in a code editor of your choice. That’s exactly what Infrastructure as Code is about: it allows for automating the cloud infrastructure (servers, containers, databases, storage…) provisioning with the use of a high-level, declarative programming language. Some solutions, e.g. AWS CDK, support also more familiar, general-purpose languages (TypeScript, JavaScript, Python, Java, C#, .NET), which makes defining infrastructure in the cloud even easier.
IaC provides developers and other parties involved (DevOps specialists, testers, and even clients) with a number of benefits:
- recreating test, production or dev environments using simple commands,
- creating multiple environments at once,
- using templates to speed up the whole process and make it error-free,
- reducing the amount of repeated, manual work,
- version control and keeping track of changes: code used as the infrastructure documentation,
- advanced deployment options, such as blue-green deployment or canary deployment.
These are the reasons why IaC has become a must-have for many development teams, especially those that follow DevOps practices, such as the immutable infrastructure approach.
What is AWS CloudFormation?
Nowadays, developers can choose between a plethora of tools, the most popular being Terraform, AWS CloudFormation, Azure Resource Manager, AWS Cloud Development Kit. In today’s article, we’re going to talk about CloudFormation given that we’re deploying an AWS application. Terraform will be covered in the second part of our IaC series.
Getting straight to the point: CloudFormation is a tool for modeling and provisioning AWS and third-party cloud infrastructure resources in an automated manner. With CloudFormation, you can create templates to simplify tasks related to infrastructure management, replicate infrastructure across different projects, and easily track changes. You define cloud infrastructure by coding it from scratch or using one of the sample templates in text files, in either JSON or YAML format. Then you just upload the code to the Amazon S3 bucket (it can be done directly in the AWS CloudFormation console as well) and create a stack with CloudFormation. Let’s dive into the hands-on tutorial to see a real-life example.
Deploying a web app on AWS with CloudFormation
From this short guide, you will learn how to use CloudFormation and Infrastructure as Code to deploy your web application on Amazon Web Services cloud. In this case, we will create a production environment. Deploying to the development environment is very similar, and you can find the detailed tutorial on our Github page, together with YAML files and all the required and optional code.
In order to show how you can build infrastructure and deploy applications with CloudFormation, I’ve created a simple web app called Best Picture showcasing Academy Award-winning movies.


Application architecture

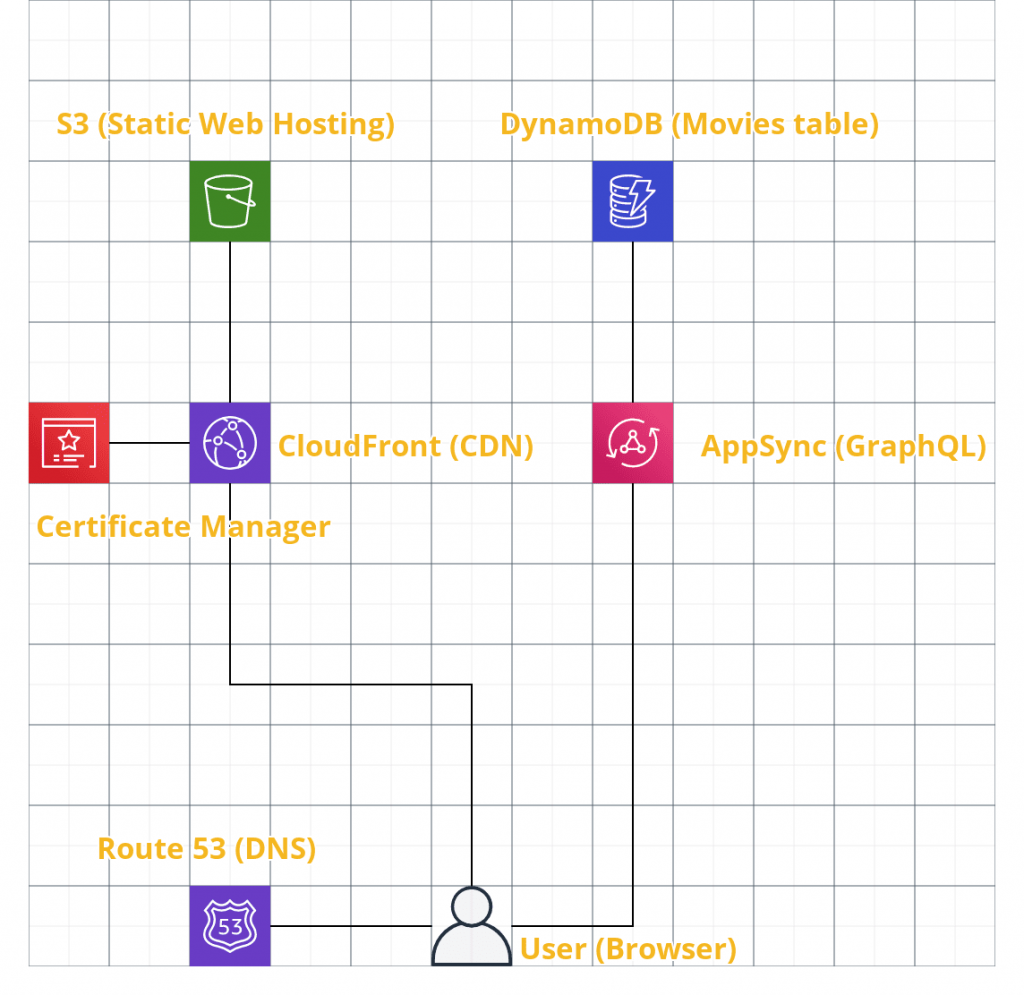
Front-end: the client-facing side is written in React.js and uses the Material-UI framework, as well as the Apollo Client (GraphQL library for JavaScript) for the front-end API. The JavaScript and HTML files are uploaded to the S3 bucket. Amazon CloudFront is used as the content delivery network, and the AWS Certificate Manager provides an SSL certificate to ensure HTTPS access. Last but not least, the Amazon Route 53 allows for DNS configuration.
Back-end: GraphQL gateway with AWS AppSync is used to fetch data from the Amazon DynamoDB database, where the table with Academy Award-winning movies data is located.
Step-by-step tutorial: deploying to production environment
Now it’s time to get your hands dirty and create our production environment. Remember to check and analyze the code that you can find in the repo.
First things first, prepare a DevOps S3 bucket, where you will copy a nested stack (i.e. a stack created within another stack) and back-end files, e.g. AWS AppSync GraphQL schema. In this demo, it’s a public S3 bucket, but an additional configuration is recommended for better security. Insert the following command in the AWS Command Line:
cd .\infrastructure\
.\prepare-devops-bucket.bat
Then, create the CloudFormation stack:
aws cloudformation create-stack --stack-name prod --template-body file://stack.yaml --parameters ParameterKey=Environment,ParameterValue=prod --capabilities CAPABILITY_NAMED_IAM
As you can see, with “ParameterKey / Value” we define the environment. In this demo, it’s production.
You have to wait a few minutes until the infrastructure is created. You can go to the AWS console to check whether the process is finished or simply use this command:
aws cloudformation wait stack-create-complete --stack-name prod


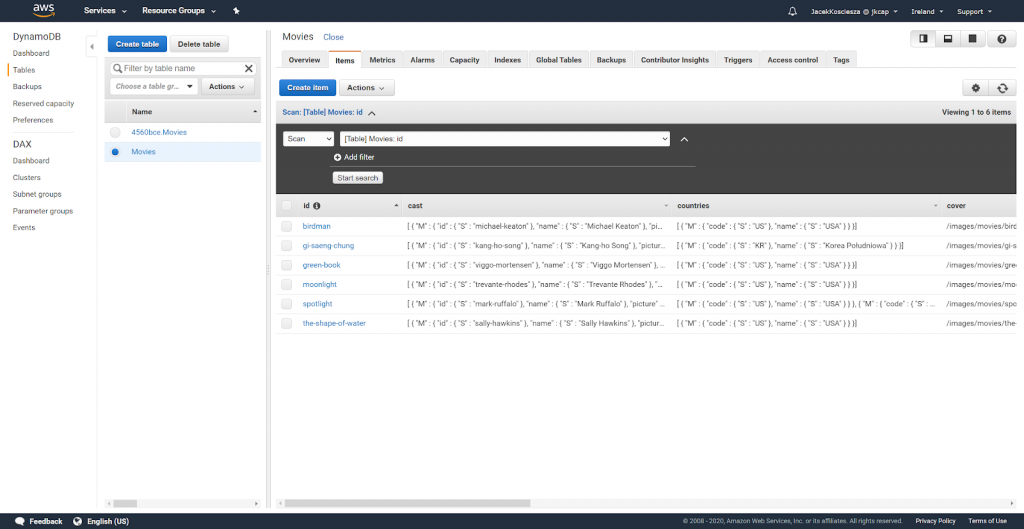
Now you should initialize the DynamoDB database. Change the folder to:
cd ..\backend\DynamoDB
Then get the name of the DynamoDB table with movies data:
aws cloudformation describe-stacks --stack-name prod --query "Stacks[0].Outputs[?OutputKey=='DynamoDBMoviesTableName'].OutputValue" --output text
Modify the table name inside the Movies.json file. Batch write items with the command:
aws dynamodb batch-write-item --request-items file://Movies.json
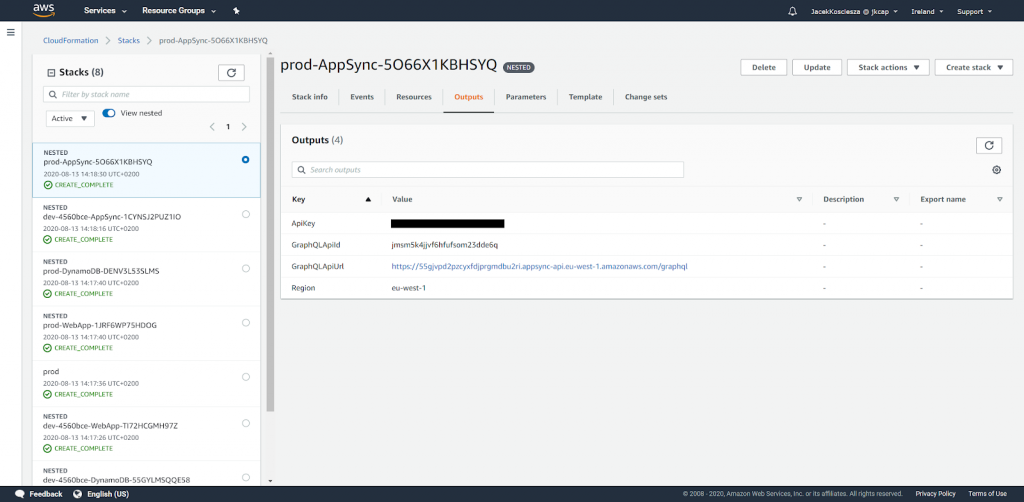
Now it’s time to build and deploy the front-end (React) application. To do so, get the AppSync API URL and the API key either from the AWS console or by typing a command, and set environment variables using the values obtained:
API URL
aws cloudformation describe-stacks --stack-name prod --query "Stacks[0].Outputs[?OutputKey=='AppSyncGraphQLApiUrl'].OutputValue" --output text
Use this output in the next command:
$Env:REACT_APP_AWS_APPSYNC_GRAPHQL_API_URL = 'https://55gjvpd2pzcyxfdjprgmdbu2ri.appsync-api.eu-west-1.amazonaws.com/graphql'
API Key
aws cloudformation describe-stacks --stack-name prod --query "Stacks[0].Outputs[?OutputKey=='AppSyncApiKey'].OutputValue" --output text
$Env:REACT_APP_AWS_APPSYNC_API_KEY = '███████████████'

Now, to complete the final steps, you can retrieve the stack outputs and set environment variables e.g. the S3 bucket name for static web hosting. This time, you can also do it in the AWS console or by using the command:
aws cloudformation describe-stacks --stack-name prod --query "Stacks[0].Outputs[?OutputKey=='WebAppBucketName'].OutputValue" --output text
cd ..\..\frontend
yarn build
aws s3 sync build/ s3://bestpicture.link --acl public-read
That’s it: your web application on AWS is up and running!
What’s next?
It’s worth noting that CloudFormation is an AWS-only tool. So if you’re keen on working with Infrastructure as Code on other cloud platforms such as Azure or Google Cloud, you might want to consider different tools. And I have good news: in our next blog post from the IaC series, we are going to talk about Terraform, or in other words, CloudFormation on steroids. We’ll also provide a tutorial, so stay tuned!